Friday, March 28, 2008

My photoshop!

Original


Whit Ph

Correcting Images

When I have a new image in front of me, what should I do firstdo some retouching or fix the tone and color???

Typically, it's best to correct tone and color first. It can be easier to spot abnormalities like dust spots if the image generally looks normal. Unlike scans, digital camera images won't have surface defects, so those images can always go straight to color correction.

The important thing is to complete both basic color correction and remove unwanted blemishes (such as pimples and telephone wires) before you start making copies for different media, or moving on to deeper edits. If you ever need to go back to your master image, you don't want to have to recreate changes you made later in the process. For example, let's say you crop and resize an image and then remove unwanted telephone wires. Later you realize you need another version of the master image with a different crop. The telephone wires weren't removed in the master, so you'll have to remove them again.

Give the image a quick check again after you apply sharpening. Sometimes sharpening brings out blemishes or film scratches that were not visible before.

You can see all of the view shortcuts in the Photoshop Help file. They're in the topic "Keys for Viewing Images."

Checking an Image for Surface Defects

Photoshop power users have a systematic way of carrying out search-and-destroy missions in search of image defects. When the image contains many more pixels than the screen, a popular method is to use keyboard shortcuts to scroll to check the image sector by sector. Here's how to do it:

1. Click one of the Full Screen mode icons on the toolbar (or press F), and press Tab to hide all the palettes.
2. Press Command-Option-zero/Ctrl-Alt-zero to jump to Actual Size.
3. Press the Home key to scroll to the upper left corner of the document. Inspect this portion of the image for defects, and fix them if needed.
4. Press Command/Ctrl-Page Down to scroll the document one screenful to the right. Inspect this area and fix defects as needed, then scroll another screenful to the right
5. When you reach the right edge of the document, press Page Down to go down one screenful. Inspect and fix as needed.

6. On this row, press Command/Ctrl-Page Up to scroll the document one screenful to the left, inspecting and fixing until you reach the left end of the row. Keep moving back and forth, row by row, until you reach the end of the image.

Reading a Histogram

Everyone tells me to check the histogram when I'm evaluating image quality, but to me, it's just a graph. What am I looking for when I view a histogram?

For a typical image, a good histogram shows a full, solid range of tones from black to white. When you evaluate a histogram, you're keeping an eye out for two things: gaps and clipping (Figure ):


A gap at the left side means no pixels in the image are black. If you want black pixels, adjust the black point in the Levels or Curves dialog box, or the Shadows slider in Camera Raw.
A gap at the right side means nothing in the image is white.
Gaps in the middle mean there are tones where no information exists. Small gaps are rarely a problem, but if there is a regular pattern of gaps, you might see posterization or stair-stepping in the image's gradations.
If the histogram falls off abruptly at the left or right edge, too many levels may be clippedyou may have lost shadow or highlight detail. Look into this further in the topic "Checking for Clipping."
Keep in mind that there's no ideal histogram; it all depends on the image. If you take a picture of a cloudy sky, there won't be any black in the image, therefore it would be normal to see most of the image's tones at the right side of the graph.
Tip

For some other ways to view the Histogram palette, try the alternate views in the Histogram palette menu. For example, All Channels View lets you see a histogram for each color channel individually.

My photoshop!


Thursday, March 27, 2008

Free Web Version of Photoshop Launches

photoshop expres!!!!un photoshop light, care sa se incarce repede si sa aiba doar functii de baza si e GRATIs!!!www.bestphotograf.blogspot.com!!!!
Free Web Version of Photoshop Launches
https://www.photoshop.com/express/landing.html
The maker of the popular photo-editing software Photoshop on Thursday launched a basic version available for free online. San Jose, Calif.-based Adobe Systems Inc. says it hopes to boost its name recognition among a new generation of consumers who edit, store and share photos online.

While Photoshop is designed for trained professionals, Adobe says Photoshop Express, which it launched in a "beta" test version, is easier to learn. User comments will be taken into account for future upgrades. Photoshop Express will be completely Web-based so consumers can use it with any type of computer, operating system and browser. And, once they register, users can get to their accounts from different computers.

Tuesday, March 25, 2008

Upgrading smoothly Plugins Photoshop Cs2

Upgrading Smoothly
Because Photoshop is upgraded every 18 months or so, you may experience the upgrade process a few times before you've even accumulated five years of experience with the program. But upgrading can lose files and settings that your workflow may depend on. Therefore, we want to include a few topics that help you upgrade Photoshop without throwing your workflow into a tailspin.

Migrating Your Plug-ins
I upgraded to Photoshop CS2 and none of my non-Adobe plug-ins came along for the ride. Do I have to buy them all over again?

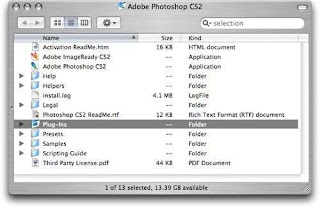
Photoshop plug-ins are installed into the Plug-ins folder inside each Photoshop version's application folder. This means that plug-ins don't automatically appear in a newer version of Photoshopyou have to move them manually. Before you delete your old Photoshop folder, locate each non-Adobe plug-in and drag it to the corresponding folder in the Photoshop CS2 Plug-ins folder (Figure 1.5).


Figure 1.5. The Plug-ins folder inside the Photoshop CS2 folder


If you move a plug-in to a newer version of Photoshop and it isn't compatible, Photoshop displays an alert (when you launch the program) telling you that the plug-in wasn't loaded. At that point, you know that it's time to get a newer version of that plug-in.

Migrating Actions
OK, so I've got my plug-ins working in the upgrade. But now I don't see all of my carefully crafted Photoshop actions. What's the answer this time?

Before you upgrade, save your actions from the Actions palette to a file on disk. (This is also a good way to back up your actions at any time.) Here's how:

1. In the Actions palette, click the Create New Set button.


2. Name the folder and click OK. Now you've got a folder where you can store just the actions you create (Figure 1.6).


Figure 1.6. A design studio's custom actions kept in their own folder, separately from Photoshop CS2's Default Actions.


3. If you're storing any custom actions in Photoshop's default actions folder, drag your actions into the folder you created.


4. In the Actions palette menu, choose Save Actions.


5. Specify a name and location, and click Save.


Once your old actions are saved to disk, you can import them into Adobe Photoshop CS2 by choosing Load Actions from the Actions palette menu, locating your saved actions file, and clicking Load.

You'll probably want to test any actions you migrate between versions. Some actions might not work correctly if they depend on commands, palettes, dialog boxes, and file locations that have changed.

Tip

If you have any plug-ins that didn't come with Photoshop, keep them in a folder that's independent of the folders containing the plug-ins that do come with Photoshop. For example, if your name is John, create a folder named John and drag your non-Adobe plug-ins into that folder only. When you upgrade to a new version, just move or copy that whole folder to your new Photoshop's Plug-ins folder. This works because Photoshop finds any plug-in in any subfolder of the Plug-ins folder.


Migrating Your Preferences
Can I transfer my Preferences dialog box settings to a new version? The settings I use are quite different than the defaults.

Alas, there's no way to directly transfer your current set of preferences from one version to another, or from one person to another. However, you can make a record of the settings in your Preferences dialog box and enter them into the new version.

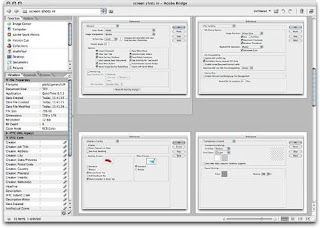
Instead of having to write down all of your settings, we like to take a screen capture of each pane and refer to them as we set up our new version of Photoshop. Note that if you put your set of Preferences screen shots into their own folder, you can use File Browser (in CS) or Adobe Bridge (in CS2) to browse to that folder so that you can easily cycle through the screen shots as you adjust each one in the new version of Photoshop (Figure 1.7).


Figure 1.7. Screen shots of Photoshop CS preferences viewed in Adobe Bridge for reference

[View full size image]


Migrating Workspaces
I've painstakingly arranged Photoshop workspaces. How can I transfer these to a new version of Photoshop?

Because the number and shape of palettes can change between Photoshop releases, workspaces aren't always carried over to new versions.

You can try to move the old workspace files to the new version. On Mac OS X, workspaces are stored here:

Computer/username/Library/Preferences/Adobe Photoshop CS2 Settings/WorkSpaces


In Windows, workspaces are stored here:

C:\Program Files\Adobe\Adobe Photoshop CS2\Presets\Workspaces


However, Photoshop is very sensitive to changes in the window environment. Photoshop may reset to the default workspace if there is anything even slightly incompatible about the old workspace, such as if a workspace uses a palette that's changed. If transferring old workspaces doesn't work, you'll need to create new workspaces in Photoshop CS2.

Tip

We hope you've noticed that one of the most important upgrade tips is to keep a backup of your old Photoshop installation until you're sure that you've migrated all of your Photoshop customizations to your new version of Photoshop.

Adobe cs2 Breakthroughs

First Things First
Getting To Know You
Each time I launch Photoshop I'm overwhelmed by all the palettes and menus. What's the best way to get familiar with what I see on screen?

Becoming familiar with Photoshop's work area is a wise first step. The entire work area is designed not only to provide you with the tools you need, but also to surround the document window with useful information about the status of the image, the current tool, and Photoshop itself. Because Photoshop is used in many different and specialized ways, it's possible to customize the work area to a great extent. We show you how in "Making Arrangements for Your Palettes," later in this chapter.

Here is an overview of the Photoshop work area (Figure 1.1):

Menu bar. As in other programs, the menu bar contains commands you can apply to alter an image or Photoshop's behavior.

Options bar. Located just below the menu bar, the Options bar presents controls for the tool you've selected in the Tools palette.

Palettes. The Tools palette appears along the left edge of the work area, while other palettes appear along the right edge. You can arrange palettes by dragging the tab at the top of a palette, and you can show or hide palettes using the commands under the Window menu. We give you more palette-arranging tips in "Windows and Palettes," later in this chapter.

Tip

Because the controls on the Options bar change when you change tools, the Options bar isn't like those unchanging horizontal toolbars found in other programs. Note that you can always jump to the first editable field of the Options bar (when there is one) by pressing the Return/Enter key. If there is more than one field, you can Tab or Shift-Tab from one to the next.


Document window. Photoshop makes good use of the space around the document window. Along the top of the window you see the normal title bar. To the left of the title is a preview icon that's dimmed (on the Mac OS) if recent changes aren't saved. To the right of the title are the zoom percentage, the color mode, and the bit depthplus the preview mode, if View > Proof Colors is turned on (not shown in Figure 1.1).

Along the bottom edge of the document window, at the left edge, you'll find a numerical field you can use to control the view magnification. To the right of that is a Version Cue indicator icon (it won't do anything if Version Cue is disabled), and to the right of that is a status bar you can customize by clicking the triangle.


Figure 1.1. In the default Photoshop work area, you see the Tools palette on the far left, the menu bar across the top, and the Options bar under the menu bar. At the far right of the Options bar is the palette well, and to the left of the palette well is the Go to Bridge button that switches to Adobe Bridge (or File Browser in Photoshop CS).


Teaching Yourself Photoshop
Okay, I've bought your book. But other than your sage wisdom, what might I do when I have a question that isn't answered in this particular book?

While there's been much grumbling about the increasing rarity of printed manuals, information about Photoshop is much faster and easier to find onlineboth on your own computer, and over the Internet.

The online help system contains all of the topics in the printed manual along with additional topics, so you're more likely to find and answer there. Open the help system by choosing Help > Photoshop Help (Figure 1.2).


Figure 1.2. The Photoshop help system


If you need a quick description of a tool or control that you can see in front of you, a tool tip might help (Figure 1.3). If tool tips don't appear when you hover your cursor over a tool or palette, you might need to turn them on; choose Photoshop > Preferences (Mac OS X) or Edit > Preferences (Windows) and turn on Show Tool Tips.


Figure 1.3. Tool tips appear in a yellow rectangle


In Photoshop CS2, Adobe uses the bottom of the Info palette to provide a little more information than they could fit in the tool tips (Figure 1.4). The Info palette goes beyond simply telling you about the currently selected tool. It reminds you how modifier keys can change the tool's behavior.


Figure 1.4. The bottom of the Info palette for the Marquee tool with no keys pressed (left) and with Shift key pressed (right)


In addition to the training resources that come with Photoshop, don't forget about the wealth of educational materials available online. Adobe keeps a vast storehouse of tips and techniques on its Adobe Studio site (studio.adobe.com). We also like the Web sites photoshopnews.com and photoshoptechniques.com. You can discover countless other tips by typing "Photoshop tips" or "Photoshop tutorials" into your favorite online search engine. And, of course, there are always books on the subject, such as this one, David's Real World Photoshop (which he co-authored with Bruce Fraser)

Sunday, March 23, 2008

Photo Gallery Scripts problem & other

The best photo Gallery is the Neo Photo gallery
http://forum.area82.it/index.php?a=misc&CODE=01&id=13