Typically, it's best to correct tone and color first. It can be easier to spot abnormalities like dust spots if the image generally looks normal. Unlike scans, digital camera images won't have surface defects, so those images can always go straight to color correction.
The important thing is to complete both basic color correction and remove unwanted blemishes (such as pimples and telephone wires) before you start making copies for different media, or moving on to deeper edits. If you ever need to go back to your master image, you don't want to have to recreate changes you made later in the process. For example, let's say you crop and resize an image and then remove unwanted telephone wires. Later you realize you need another version of the master image with a different crop. The telephone wires weren't removed in the master, so you'll have to remove them again.
Give the image a quick check again after you apply sharpening. Sometimes sharpening brings out blemishes or film scratches that were not visible before.
You can see all of the view shortcuts in the Photoshop Help file. They're in the topic "Keys for Viewing Images."
Checking an Image for Surface Defects
Photoshop power users have a systematic way of carrying out search-and-destroy missions in search of image defects. When the image contains many more pixels than the screen, a popular method is to use keyboard shortcuts to scroll to check the image sector by sector. Here's how to do it:
1. Click one of the Full Screen mode icons on the toolbar (or press F), and press Tab to hide all the palettes.
2. Press Command-Option-zero/Ctrl-Alt-zero to jump to Actual Size.
3. Press the Home key to scroll to the upper left corner of the document. Inspect this portion of the image for defects, and fix them if needed.
4. Press Command/Ctrl-Page Down to scroll the document one screenful to the right. Inspect this area and fix defects as needed, then scroll another screenful to the right
5. When you reach the right edge of the document, press Page Down to go down one screenful. Inspect and fix as needed.
6. On this row, press Command/Ctrl-Page Up to scroll the document one screenful to the left, inspecting and fixing until you reach the left end of the row. Keep moving back and forth, row by row, until you reach the end of the image.
Reading a Histogram
Everyone tells me to check the histogram when I'm evaluating image quality, but to me, it's just a graph. What am I looking for when I view a histogram?
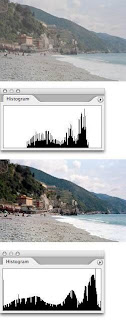
For a typical image, a good histogram shows a full, solid range of tones from black to white. When you evaluate a histogram, you're keeping an eye out for two things: gaps and clipping (Figure ):

A gap at the left side means no pixels in the image are black. If you want black pixels, adjust the black point in the Levels or Curves dialog box, or the Shadows slider in Camera Raw.
A gap at the right side means nothing in the image is white.
Gaps in the middle mean there are tones where no information exists. Small gaps are rarely a problem, but if there is a regular pattern of gaps, you might see posterization or stair-stepping in the image's gradations.
If the histogram falls off abruptly at the left or right edge, too many levels may be clippedyou may have lost shadow or highlight detail. Look into this further in the topic "Checking for Clipping."
Keep in mind that there's no ideal histogram; it all depends on the image. If you take a picture of a cloudy sky, there won't be any black in the image, therefore it would be normal to see most of the image's tones at the right side of the graph.
Tip
For some other ways to view the Histogram palette, try the alternate views in the Histogram palette menu. For example, All Channels View lets you see a histogram for each color channel individually.

No comments:
Post a Comment